3.2 Sample Checking and Actions |

|

|
|
3.2 Sample Checking and Actions |
|
|
3.2 Sample Checking and Actions |
|
|
|
3.2 Sample Checking and Actions |
|
|
When a sample is triggered, the sample will test for a condition and then perform an action based on the success or failure of the condition. Both the condition and the actions can be changed using the Code Generation Options dialog. You can choose from several predefined conditions and actions or directly enter the HDL code.
To define the condition and actions of a sample:
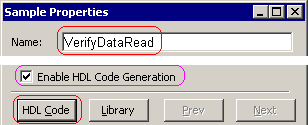
•Double-click on the Sample name to open the Sample Properties dialog. •Verify that Enable HDL Code Generation is checked, so that the code can be generated for the sample. •Press the HDL Code button to open the Code Generation Options dialog. |
|
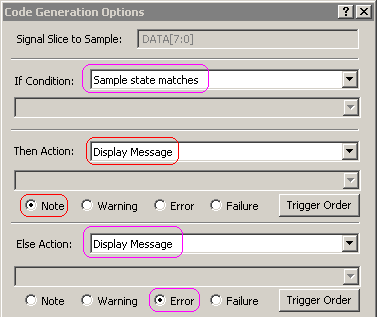
•The code for a Sample is modeled like an if-then-else statement. If you choose User Defined for the if condition or the actions, then the edit box below will become active and allow you to enter code. The code will usually either call a class method that has been defined for the transaction (Section 6.1: Variables) or is a short HDL expression, like SAMPLE0_process_Flag and SAMPLE1_process_Flag, that makes use of the internally generated sample variables (Section 3.5: Using Sample Variables). |
|
The If Condition:
•The If Condition controls what the sample checks for. |
|
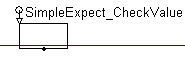
•For Point Samples, the test bench will compare the drawn state of the expected signal to the waveform that comes back from the MUT. •Sample state matches: If the monitored value matches the expected value (as drawn in the timing diagram), the Then Action will be taken otherwise the Else Action will occur. •Sample State doesn't match: If the monitored value matches the expected value (as drawn in the timing diagram, the Else Action will be taken otherwise the Then Action will occur. |
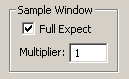
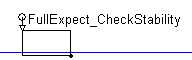
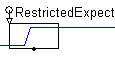
•For Windowed samples, the Full Expect box controls when the sample will trigger its action. If Full Expect is checked, then it will wait until the end of the window to trigger the action, and this is shown graphically by a dot at the end of the window. If unchecked, the sample is a Simple Sample and the the action will trigger any time during the window when the "if condition" becomes true, and this is indicated by the dot in the middle of the window. If a sample is clocked, then the value of the waveform will be sampled at each clock edge that occurs within the sample's window. |
|
If a sample window is drawn over a stable section of waveform:
•A Full Expect sample will require the MUT waveform to be stable for the entire windowed time in order for the condition "sample state matches" to be true. |
|
•A simple sample will be true if at any time during the window the MUT waveform goes to the value of the drawn waveform. |
|
If a sample window is drawn over a section of waveform with one or more transitions:
•For a Full Expect sample, all transitions must match and the MUT waveform cannot have any more transitions than the drawn signal. |
|
•A simple Sample will trigger true as soon as the MUT has produced the matching transitions in the same order. If an unexpected transition occurs, the condition will immediately fail and execute the Else action. If not enough transitions are detected, the sample will time-out at the end of the window and the Else action will be executed. |
|
Extending the sample window with a multiplier
•The Multiplier property extends the window of time for a sample. The difference between the min and max values (in the Sample Properties dialog) will be multiplied by the value of the multiplier to determine the length of the sample. This also provides a method to indirectly specify a timeout for a sample. Since this method of extending the sample window does not appear graphically, it can be used for very large windows that would not be very pretty to look at. |
The Actions:
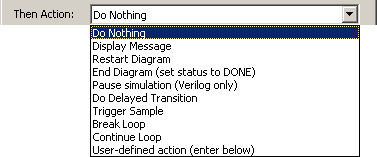
•The Then Action and Else Action boxes control which actions are taken on the success or failure of the sample condition. Select one of the following actions: •Do nothing: take no action if this branch is executed. |
|
•Display Message: Display a message in the simulation log using the severity level defined by the radio buttons below the action. •Restart Diagram: Resets and restarts the transaction execution. •End Diagram (set status to Done): Ends execution of this particular transaction. The bus-functional model will continue to execute as if this transaction had normally ended. •Pause Simulation (Verilog only): Stops the entire simulation (via $stop command). •Do Delayed Transition: Creates a delayed state transition (see Section 3.4: Samples Trigger Delayed Transition or Another Sample) that triggers based on the results of the If Condition. •Trigger Sample: creates a triggered sample (see (see Section 3.4: Samples Trigger Delayed Transition or Another Sample) that will fire based upon the results of the If Condition. •Break Loop: stops the loop that immediately surrounds the sample. •Continue Loop: returns to the beginning of the loop immediately surrounding the sample, skipping the last part of the loop. •User-defined action (enter below): lets the user directly enter VHDL or Verilog code for the action into the edit box below the action drop-down list box. See Section 3.5: Using Sample Variables for more information. |
•The level setting effects the beginning of the message that will be sent to the simulation log file. |
|
•The Trigger Order button opens a dialog that lets you rearrange the order in which markers and samples triggered off the same edge will begin to execute. |
The Blocking control is described in Section 3.3 Samples that Block Clock Domains. The Store Sampled Value As Subroutine Output is covered in Section 3.5 Using Sample Variables. And the Enable Variable control is covered in Section 3.6 Storing Sample Values in User Defined Variables. The default actions for the if-then-else boxes are set in the Diagram Settings dialog (Section 9.8: Diagram Settings dialog)