3.1 Adding a Sample |

|

|
|
3.1 Adding a Sample |
|
|
3.1 Adding a Sample |
|
|
|
3.1 Adding a Sample |
|
|
How you draw the sample determines whether it will be an Absolute Sample (triggered by time) or a Relative Sample (triggered by an event). The monitoring time or interval will be set using the Samples Properties dialog. The sample actions to take if it succeeds or fails will be set using the Code Generation Options dialog discussed in Section 3.2.
Draw a Sample and set the triggering event or time:
•Press the Sample button so that right mouse clicks will add samples to the diagram. |
|
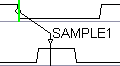
•To attach a sample to a time, make sure no edges are selected, then right click on a waveform to be tested. This will add a sample. |
|
•To attach a sample to an edge, left click on the control edge to select it, then right click on the waveform to be sampled. This will add a sample between the control edge and the waveform to be tested. |
|
•The exact time at which the sample is placed can be changed using the Samples Properties dialog discussed in the next step. |
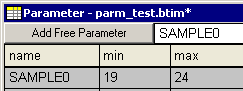
•When a sample is added to the diagram, it is also added to the Parameter Window. |
|
Use the Samples Properties Dialog to set the monitoring time and properties of the sample:
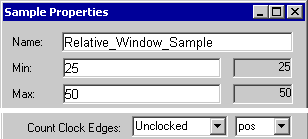
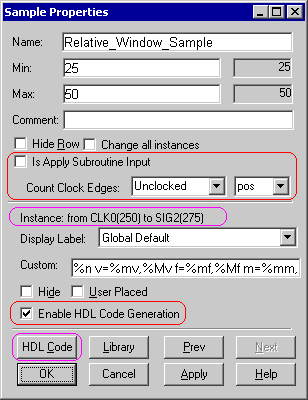
•Double-click the sample name to open the Sample Properties dialog. •Samples can be cycle-based instead of time-based. The Count Clock Edges settings allow a clocking signal and edge to be specified for the sample, this setting also defines whether the Min and Max boxes are accepting times or clock cycles. |
|
•Type real time or clock cycles into the Min and Max edit box. If the min and max are different than the sample will be a Window Sample. |
|
•For TestBencher Pro, the Is Apply Subroutine Input, if checked, generates input ports to the timing transaction that can be used to specify the values to use for the min and max settings of the sample. •The Instance describes the triggering event for the sample, which is either the time for an Absolute sample, or the triggering signal and time offset for a Relative sample. The triggering events are set by how the sample is drawn. •The Enable HDL Code Generation checkbox must be checked for any code to be generated for the sample. •The HDL Code button opens the Code Generation Options dialog that defines the actions of the sample. This is covered in Section 3.2: Sample Conditions and Actions. |
|
The Sample Properties dialog also has many settings that control how the sample is displayed in the timing diagram. Since Samples are parameters (just like delays, setups, and holds) most all of the parameter editing techniques also work for samples. These features are covered in the Timing Diagram Editor on-line help in Chapter 5: 5.3 Display Settings for Parameters, 5.4 Drawing and Editing Parameters, 5.5 Hiding Parameters, and 5.6 Parameter Window.