6.1 Variables |

|

|
|
6.1 Variables |
|
|
6.1 Variables |
|
|
|
6.1 Variables |
|
|
In TestBencher, variables can be local to either the diagram or to the project's Transaction-Level Model (Reactive Test Bench only supports diagram-level variables). Diagram-level variables are declared within the transactor source code, and project-level variables are declared within the Project's TLM. Simple variables can be created while editing diagram objects. For example, adding a signal state with a prefix of $$ creates a state variable.The Classes and Variables dialog enables the creation of more complex variable types. Variables can be used anywhere that you type in HDL code including: Boolean equation and Condition boxes, Sample values, Loop control variables, HDL code markers, class methods, and waveform state values.
Variables are used to store data that can be set and accessed during simulation. The data type of a variable can be any of the generation language’s native data types, or any user-defined class that is local to the project. Variables can also be defined to have structures like queues, arrays, associative arrays, input files and output files (depending on the abilities of the target generation language).
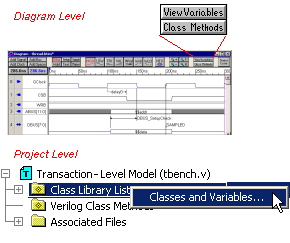
Create Variable using the Classes and Variables Dialog:
•Open the Classes and Variables dialog from either the diagram (for diagram-level variables) or from the Project (for project-level variables): •For diagram-level variables, press the View Variables button in the Diagram window. •For project-level variables, right click the Transaction-Level Model folder (or most of the folders in that section) and select Classes and Variables from the context menu. It can also be opened by the Project > Classes and Variables menu or by double-clicking on the Variable List (if variables already exist). |
|
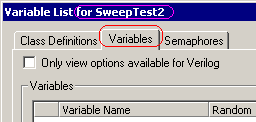
•Select the Variables tab. Depending on where you opened the dialog and which objects are defined at that level, the dialog may have several tabs or just the Variables tab. •Notice that the title bar of the dialog indicates the timing diagram or project file that the variables are stored within. |
|
•Press the New Variable button near the bottom of the dialog to add a new variable. You can also just click on a blank variable line and start typing a new variable. Either method creates a new variable with default properties in the Variables list box. |
|

•Double-click on the column for any property that needs to be edited. This will cause either an edit box or a drop-down list to be opened that can be used to set the field property. The variable properties are defined in Section 6.12: Variable and Class Field Properties. In particular, the Data Type property can be either one of the builtin types for the generation language or a Class type as defined in Section 6.2: Classes. |
Diagram-Level Variable Overview:
There are three types of variables that can be used inside a transaction: diagram variables, state variables, and parameter-based variables. When using a variable as an input or output to the transaction there are certain rules that are based on how the variable type is defined. The following table describes the differences and uses for the different variable types when used as a port in the transaction.
Structure |
Direction |
Advantages |
Disadvantages |
Diagram Variable |
Input, Output, or Internal to the diagram |
Size and Type are controlled by the definition. Type can be simple or complex. Most versatile variable type. |
Only visible in the View Variables dialog until referenced in the diagram. Not convenient for driving Parameter constructs such as Delays. |
State Variable |
Input only |
Very quick to add. |
Size is controlled by the signal type to which the variable is attached. |
Parameter |
Input |
Contains both min and max values for passing time values to Parameter constructs. |
Both min and max values are not needed for many situations. Assumed to hold either a real or clock time. |
Using Diagram Variables
Diagram Variables are created using the Classes and Variables dialog as described above. These are the most versatile structures for holding information, complex data structures, and for passing information into and out of the transaction.
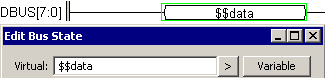
•In a waveform state, put an @ symbol prefix in front of the diagram variable name like, @name, to indicate that it is a variable and not just a text string. You can also select the variable from a list by clicking the Variables button in the Edit Bus State dialog. |
|
•In a block of code, just use the diagram variable name. Some examples of code that might use a variable are class methods, condition statements for samples and markers, and marker loop parameters such as begin, end, and increment values. •To use a diagram variable to store a sample value, use the Variable features of sample’s HDL Code Generation dialog as described in Section 3.6: Storing Sample Values in User Defined Variables. |
Using State Variables (TestBencher Only)
TestBencher state variables defined in the Edit Bus State dialog by typing in a variable name that begins with two dollar signs, like $$addr. See Section 2.4 Waveform States with Variables and Conditions has more information on creating state variables. State variables are automatically added as an input to the parameter list for the transaction call. The type and size for these variables are determined by the signal that is being driven. Each time the transactor is called, a new state value can be passed into the variable.
•Double-click on a waveform segment to open the Edit Bus State dialog. •Type in a name with the prefix $$ into the Virtual Edit box. For example, $$data is a valid name for a state variable. |
|
•State variables are added to the parameter list for the transaction call. |
// Apply_tbwrite( addr , data ); Apply_tbwrite( 'h55 , 'hee ); |
Using Parameter Variables
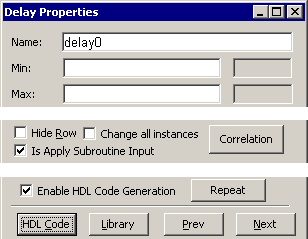
Delays, setups, holds, samples, and free parameters have two variables, parametername_min and parametername_max that can be used to hold information and to pass information into a transaction. These variables pass time (either in real times or in clock cycles) to transactions. These are the recommended variable type to use to pass information to the min and max boxes for delay, setup, hold, or sample parameters. They are also the recommended variable type to use in a Clock period formula. Other variables can be used but then you need two of them, unless you want the min and max to be the same value.
•To reference the parameter variable inside a diagram, just use parameterName_min or parameterName_max in any code block, condition statement, or in the min or max boxes of a parameter. Inside other parameters you can also use the name without the min/max suffix, and TestBencher will make the best guess as to which value you want. |
•To pass a parameter variable into a timing diagram, first add a parameter to the diagram, then double click on the parameter to open the Parameter Properties dialog. •Check Is Apply Subroutine Input to cause a subroutine parameter to be added to the transaction apply call. •Verify that Enable HDL Code Generation is checked so that code will be generated for this parameter. •When you insert the diagram transaction call into the Sequencer Process, the call will include a parameter for the delay value. |
|
•Below is some code that would loops over a transaction calls and sweeps a delay value over a specified range.. |
for (delay0 = 32.0; delay0 > 15.0; delay0 = delay0 - 5.0)
begin
// Apply_tbwrite( addr , data , $realtobits(delay0_min) );
Apply_tbwrite( 'h55 , 'hee , $realtobits(delay0) );
// Apply_tbread( addr , data , $realtobits(delay0_min) );
Apply_tbread( 'h55 , 'hee , $realtobits(delay0) );
end
Scope rules for Variables:
•Diagram-level variables are only accessible outside of the diagram if they can be hierarchically accessed in the given language.
•Project-level variables are accessible from the project’s TLM file, but the access depends on the language you are using. Chapter 11: Language Specific Details covers the details on accessing variables.