6.2 Classes |

|

|
|
6.2 Classes |
|
|
6.2 Classes |
|
|
|
6.2 Classes |
|
|
In TestBencher, project level classes can be created to hold variables and class methods that act on those variables. Since basic Verilog and VHDL do not directly support classes (as opposed to C++ and SystemVerilog), the generated code does not always look like class code, but inside the TestBencher Project and the Sequencer code that uses the class, variables and methods act like what you would expect a class to act like. Once a Class is created, it can be used when creating variables just like any native data type of the language (Section 6.1: Variables).
Class fields can use any of the generation language’s native data types or a user-defined data type (another class). Each field can have a structure of a simple element or depending on the language a queue, an array, or an associative array. For example, you can create an ethernet packet class, where each field represents a different portion of the packet's payload. Class methods can also be added to the class to act on the fields. Classes are supported in all of the generation languages. The interface for designing and accessing the classes is the same across the generation languages, but the implementation varies radically depending on the language’s support for classes and user defined data types.
Create or edit a class:
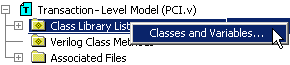
•Right click on the Class Library List folder and choose Classes and Variables to open the Classes and Variables dialog. |
|
•Select the Class Definitions tab, and notice the top of the dialog describes which classes are being edited. •Then select the Library that will contain the class. Each project has a default library named after itself (seeSection 6.4: Class Libraries for more information on libraries). |
|
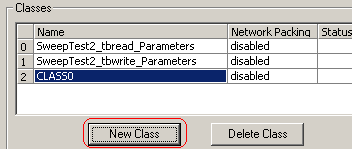
•The Classes list shows all of the classes within the selected library. •Press the New Class button to add a new class to the Classes list. •Double click on any cell to edit a property of the class. |
|
•Selecting a class name causes the Class Fields list to display the fields of the class. It also causes the Constraints and Class Methods buttons to act on the selected class. See below for adding fields, methods, and constraints to the classes. |
Add or edit a field of the class:
Classes fields can be defined manually using the New Field button or automatically using a file and the Define from Template button. Each field can either be a native data type or a class type that is defined in the same class library. Each Field can have the structure of a single element or depending on the generation language it can have complex structures like array, associative array, and queue.
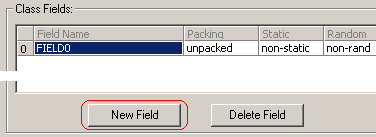
•Select a class to cause its fields to be displayed in the Class Fields list. •Either, press the New Field button to add a field to the selected class. |
|
•OR, press the Define from Template button to open a file dialog. When you choose a test vector file, the program will read the header for the file and create a data structure that has the same fields as the column headers of the file. See Section 6.9 Input Data Dynamically from a File (VHDL) describes the format of the file. |
|
•Double-click on the cell for any field property to edit it. Section 6.11 Variable and Class Field Properties defines the usage of the different field columns. |
![]()
Add or edit a method to a class:
•Select a class so that the Class Methods dialog will know which class to act on. |
•Press the Class Methods button to open a dialog for entering the class method. Section 6.3: Class Methods describes this dialog. |
|
Add or edit a constraint to a class for random number generation:
•Select a class to edit. |
•Press the Constraints button to open a dialog for entering the constraints of the selected class. Section 6.5 Constrained Random Number Generation describes this dialog. |
|