6.3 Class Methods |

|

|
|
6.3 Class Methods |
|
|
6.3 Class Methods |
|
|
|
6.3 Class Methods |
|
|
Class methods are user-defined functions and tasks that let you add HDL algorithms to the timing diagram or bus-functional model. These methods can be added to individual timing diagrams, project Transaction-Level Models, or user-defined classes. Once a class method is added to an object, it shares the same scoping level as the object. It can be called during simulation to perform activities that are difficult to describe graphically.
Scoping Level and Access to Diagram, Project, and Class level methods
Diagram-level class methods, like diagram-level variables, are local to the timing diagram in which they are created. These methods can be accessed using HDL Code Markers and Sample Actions. They are generated in the diagram transaction source file so they share the same scoping level of other diagram-level objects. The code for the methods is stored in the timing diagram file so that the methods are available for other projects (if the diagram is included in multiple projects).
For TestBencher, class-level class methods can be called from the same scoping level as the variable that instantiates the class. These methods are a part of the class definition and are stored in the respective class library. The methods are generated in the class source code definition.
For TestBencher, project-level class methods can be accessed from the Sequencer Process in the TLM file. These methods are specific to the project for which they are defined. The top-level module of the bus-functional model (generated from the top-level template file for the project) contains these methods.
Open the Class Methods dialog from the object that will own the class method:
The Class Methods dialog is used to create and edit user-defined methods. Open the Class Methods dialog from the object that you want to define the class method for:
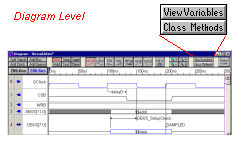
•For diagram-level methods, press the Class Methods button located in the Diagram window. These are the only methods supported by the Reactive Test Bench Generation option. |
|
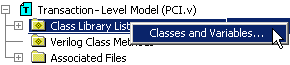
•For class-level methods, open the Classes and Variables dialog by right clicking on the Class Library list. Select a library and a class, then press the Class Methods button. |
|
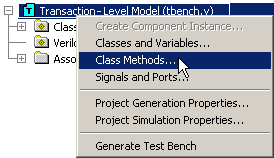
•For project-level methods, right click on the Transaction-Level Model folder in the Project window and choose Class Methods from the context menu. |
|
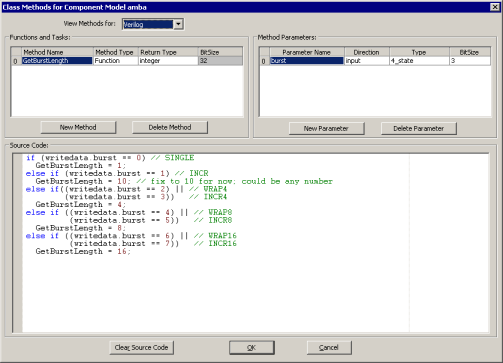
Create a Class Method and define its type and return type:
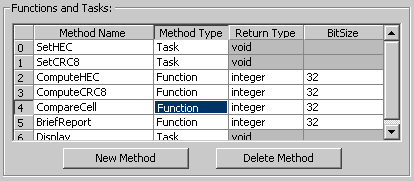
Selecting a different class method name changes the contents of the other sections of the dialog.
•Select the Language for the method in the View Methods box at the top of the dialog. |
•Press the New Method button to create a new method with default values. •Double-click on the cell to edit that property. •Method Name is the name of the method. |
|
•Method Type: Tasks perform an operation on the parameters that they are passed, but do not specifically return any value. Functions perform an operation on the parameters that they are passed and return a value. •Return Type is the data type of the value that is returned by a function. This can be any of the SynaptiCAD language independent types listed in Section 6.13: Language Independent Types. •BitSize is the size, in bits, of the value that is returned by a function. This value is only editable if the Return Type is a bit type. |
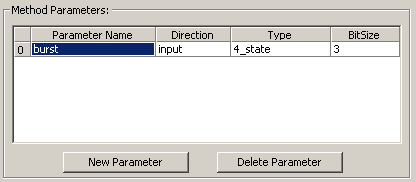
Specify the Parameters for the Selected Class Method:
The parameters represent data that is passed into the method.
•Select a class in the Functions and Tasks section of the dialog. |
•Press the New Parameter button to create a new parameter with default properties. •Double-click on a cell to edit that property. •Parameter Name is the name of the parameter. |
|
•Direction is •Type is the data type of the parameter. This can be any of the SynaptiCAD language independent types (6.13: Language Independent Types), or any of the classes in the project (Section 6.2: Classes). •BitSize is the size in bits of the parameter. This value is only editable if the Type is a bit type. |
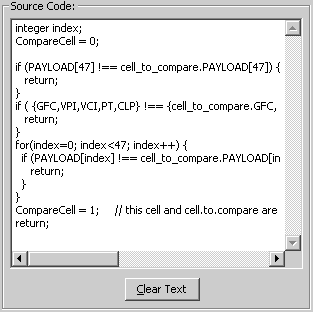
Add the Source Code for the selected Class Method
The source code is the actual code that will be placed in the generated method definition. This code is written in the generation language. Class Methods can be specified for every licensed language, allowing diagrams, class definitions, and even the Transaction-Level Model to be language independent. Add the class method source code:
•Select a class in the Functions and Tasks section of the dialog.This will cause the class methods parameters and source code to be displayed in the rest of the dialog. •Type your source code into the Source Code edit box. |
|
Using Diagram-level Class Methods
•To use a diagram-level class method in an HDL Code marker, type in the name of the class method along with any parameters into the code box of the marker (Section 5.6: HDL Code Markers). •To use a diagram-level class method in a Sample Action, choose User Defined Action for the action type. Then type in the name of the class method along with any parameters into the code box of the marker. |
Using a Project Level Class Method
•Double Click on the Transaction-Level Model folder to open the top-level test bench file and search for the User Defined Class Methods code block. This is where the code for project-level will be defined. |
// User Defined Class Methods function integer GetBurstLength; input [2:0] burst; begin ... the source code body endfunction // End $UserDefinedMethods |
•Search for the Sequencer comment, then enter code that calls the class method. |
// Transaction Sequencer - After this comment .... repeat (5) // number of bursts to perform begin ahb_master0.ApplyRandom_idle; writedata.randomize; // randomize all fields burstLength = GetBurstLength(writedata.burst); .... |