3.4 Samples Triggering a Delayed Transition or Another Sample |

|

|
|
3.4 Samples Triggering a Delayed Transition or Another Sample |
|
|
3.4 Samples Triggering a Delayed Transition or Another Sample |
|
|
|
3.4 Samples Triggering a Delayed Transition or Another Sample |
|
|
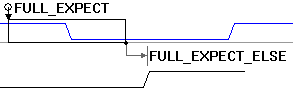
Samples can be used to trigger delayed state transitions or other samples. Chains of samples can be built up to test for complex patterns in the simulation data. When a sample in the chain triggers its then or else actions, the next sample/delay in the chain will execute.
If a sample is triggering a delay, then that sample conditionally controls the signal transition. This is especially useful if several conditions must be met prior to a transition on a control signal. An alternate, non-graphical method for conditionally triggering transitions using conditional delays is discussed in Section 4.1: Delays.
There are two different methods you can use to add a parameter to a sample. The recommended way is to add a parameter that is relative to a sample. This is the fastest way to add samples and delays to the Then and Else actions. The other method is to use the Sample’s Code Generation Options dialog. Either method will set one of the sample actions to Do Delayed Transition or Trigger Sample and attach a graphical parameter to the sample.
Method 1: (Recommended) Add a Delay or Sample to relative to a Sample
•Click the Delay button or the Sample button so that right clicks will create a parameter of the desired type. |
|
•Click on the sample name to select the sample that will trigger the new parameter. |
|
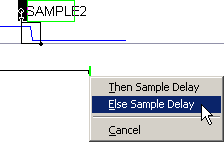
•To add a delay, right-click on the state transition that you want to be conditionally delayed. This will open a context menu. Choose either Then Sample Delay or Else Sample Delay to create the new conditional delay. |
|
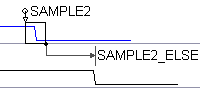
•The delay will be added from the end of the sample to the edge that you right clicked on. It will be named after the sample and the action that triggers it. |
|
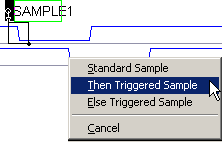
•To add a sample, right-click on the waveform you want to sample. This will open a context menu. Choose either Then Triggered Sample or Else Triggered Sample to create a chained sample. |
|
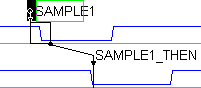
•The sample will be added between the first sample and the new waveform |
|
•The new sample or delay can be edited just like regular samples and delays, by double clicking on the name to open the Properties dialog. |
Method 2: Using the Code Generation Options dialog to add a triggered delay or sample.
•Double-click the name of a sample to open the Sample Properties dialog. •Click the HDL Code button to open the Code Generation Options dialog. •For Delays, choose Do Delayed Transition from the Then Action or Else Action drop down list box. •For Samples, choose Trigger Sample from the Then Action or Else Action drop down list box. •Click the OK button to close the Code Generation Options dialog. Note: When you close the Code Generation Options dialog, you will enter a special select mode. While you are in this mode, the Sample Properties dialog will disappear. When you exit the select mode, the Sample Properties dialog will reappear. •Right-click the state transition that will be delayed or the waveform that will be sampled. This will add the delay or sample to the diagram. |
The delay ending position can be moved to other signal transitions by selecting the delay then dragging and dropping the right handle of the delay to the new transition. Triggered samples can be edited just like regular samples.