7.1 Template, Sequencer, and Transaction Calls |

|

|
|
7.1 Template, Sequencer, and Transaction Calls |
|
|
7.1 Template, Sequencer, and Transaction Calls |
|
|
|
7.1 Template, Sequencer, and Transaction Calls |
|
|
The template file is a language-specific source code file where both the user and TestBencher insert source code for the Transaction-Level Model. TestBencher generates the Transaction-Level Model code and puts it into macros contained in the template file. The file also contains the Transaction Sequencer which is where transaction Apply and Post calls and most of the other user-written code for the test bench will be added by the user.
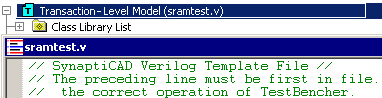
Open the Template file to edit the Transaction-Level Model and the Sequencer Process
•Double-click on the Transaction-Level Model folder in the Project window to open the template file. |
|
Don't write code inside Macro Statements
Source code can be added anywhere in the template file, except for between two macro statements. The macro statements are the locations where TestBencher will place generated code. Each time the bus-functional model is generated, any code within the macro lines is overwritten. An example of a macro keyword pair is:
-- $ComponentInstantiationsForAllDiagrams
-- End $ComponentInstantiationsForAllDiagrams
Writing Code for the Transaction Sequencer
The most common place to add source code is in the sequencer process. This process is the area where diagram calls are placed. You can also write source to define variables, call randomize functions on variables, and define loops and other control structures. You can also write code to place conditions on whether or not a diagram call is made based on information returned from previous transaction calls.
•Scroll down in the template file until you find the comment block that contains the words Transaction Sequencer. The comment will look something like the following (it changes depending on the generation language): |
//***********************************************************
// Transaction Sequencer - After this comment, define how to
// apply transactions to the model under test using:
Since the sequencer process is outside of any macro statements, code added here will be preserved during the code generation process.
Use the Insert Diagram Subroutine Call dialog to make Transaction Calls:
The fastest way to write Transaction Call statements is to use the Insert Diagram Calls dialog as described in Step 5: Define a Sequencer Process. This dialog will generate diagram apply calls so you do not need to memorize the function syntax. Chapter 11: Language Specific Details has all of the language specific call details.
•To open the Insert Diagram Subroutine Calls dialog, put the cursor in the template file on the line to insert, and then right click and choose Insert Diagram Calls from the context menu. |
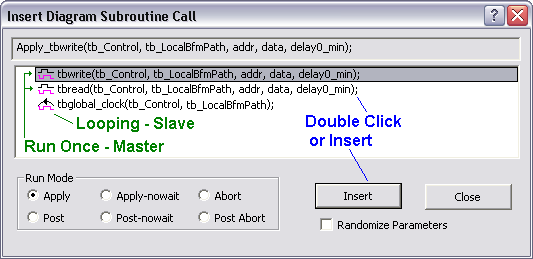
•Double clicking on a diagram name inserts the normal Apply call for the type of transaction, or use the Insert button to apply with the radio buttons. •If the transaction has parameters, you will have to edit the parameter variables in the inserted call. |
Each timing diagram generates the following tasks to run or schedule transactions for that diagram:
•Apply runs a transaction immediately in a blocking mode (the statement after this Apply will not execute until this transaction completes). •Apply-nowait runs a transaction immediately (this task returns immediately after triggering the transaction, so subsequent statements in the sequencer will execute before simulation time advances). •Post schedules a transaction on a queue for future execution. See Section 7.4 VHDL: TM fill with Post Calls. No simulation time passes during the execution of the Post call itself, but the scheduled transaction will run in a blocking mode. •Post-nowait schedules a transaction on a queue for future execution. No simulation time passes during the execution of the Post call itself. Unlike a regular Post call, the scheduled transaction will also be run in a non-blocking mode. •Abort stops an executing transaction. Mainly used to stop slave transactions (e.g. clock generator) at the end of a test sequence. •Post Abort schedules an Abort call on a queue. The specified transaction will be stopped when the Abort call is popped off it's queue. •Randomize Parameters will randomize the input parameters for Apply and Post calls. See Section 7.7 Randomizing Transaction Inputs. |
Master and Slave Transactors
The Master/Slave setting in the Diagram Settings dialog determines how many times a transaction executes (see Section 9.8 Diagram Settings Dialog). Master Transactors run once and stop. Master transactors display as an icon with waveforms in the Insert Diagram dialog. Slave transactors (e.g. a clock generator diagram) run in a looping mode. Slave transactors display as an icon with waveforms and a loop-back arrow to indicate they run repeatedly.
Example of Transaction Sequencer code
The following is a Verilog example of a sequencer process that performs a sweep test on an SRAM. The variable delay0 is defined to be a counter for a For loop. Each time the loop executes, a different delay is passed into the Write and Read cycles of the SRAM. This delay controls the timing of a waveform edge in the Write and Read transaction. Variables could have been defined for the transactions, but we chose to pass in values. The transaction apply calls were written using the Insert Diagram Calls dialog as described above. The user wrote all of the other code in this example.
// Sequencer Process
real delay0; // delay0 will serve as the index and the delay value
initial
begin
for (delay0 = 32.0; delay0 > 5.0; delay0 = delay0 - 5.0)
begin
// Apply_Tbwrite( addr , data , $realtobits(delay0_min) );
Apply_Tbwrite( 'hF0 , 'hAE , $realtobits(delay0) );
// Apply_tbread( addr , data , $realtobits(delay0_min) );
Apply_tbread( 'hF0 , 'hAE , $realtobits(delay0));
end
Abort_tbglobal_clock;
$fclose(logfile);
end
Switching Languages and Template Files
Since the template file is language-specific, if you need to change the generation language for a project after the project has already been created, the template file must also be changed using the technique described in Section 7.8: Changing a Project Template File.
Creating new Template Files
The template file is a copy of a file that was specified in the Project Wizard when the project is first created (Section 9.9: Project Menu and New Project Wizard). Normally you will use the default TestBencher template file, but you can also develop your own templates (this is not generally necessary). When developing your own templates, it is important to copy all of the Macros so that TestBencher will know where to put the generated code.