7.8 Changing a Project Template File |

|

|
|
7.8 Changing a Project Template File |
|
|
7.8 Changing a Project Template File |
|
|
|
7.8 Changing a Project Template File |
|
|
A top-level template file is automatically created for a project when the project is created and usually does not need to be changed. However, it is necessary to replace the template file for a project when the language of the project is changed, because the template file is written in the target generation language (see Section 9.6: Project Generation Properties dialog). The Copy TestBench Template dialog is used to copy a new template file into a project, and the Set TestBench Template dialog is used to switch between different template files.
Some generation languages or language combinations require multiple template files. In these cases, the template file that contains the Transaction-Level Model (including the Sequencer Process) is the template file that is named in the Copy and Set TestBench Template dialogs. Any secondary template files are copied automatically when the primary template file is copied. The secondary template files are displayed under the Transaction-Level Model folder of the Project window.
Alternate Recommended Method is to use two Projects and one Class Library:
The instructions is the rest of this section show how to switch in a new template file. This is easy to do if you are only doing it one time, however if you need to continually generate in two different languages then this can get a little confusing. So it is recommended that you instead use two projects if you will need to maintain a test bench in two languages.
Create separate projects with the language-dependent template files in different directories, then include the same transactions and class libraries into the second project. This way, if you alter the language-independent parts of the first project, they will automatically update the second project.
To copy a new template file and use it in a project:
•Choose Project > Copy TestBencher Template File menu option to open a dialog with the same name. |
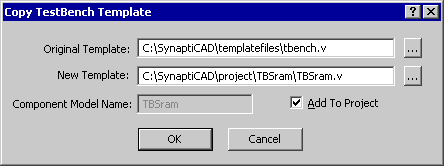
•Check the Add to Project checkbox so that the template will be included in the project. •Use Original Template box to choose a template file that matches the language that you are working or use the Browse (...) button to find one on the hard drive. If the project language is a language dialect combination, such as TestBuilder/Verilog, then the selected template should be for the primary language - TestBuilder in this case. The following is a list of the template files shipped with TestBencher: •TestBuilder use tbuidOnlyTBench.cpp as the primary and tbuildOnlyTBench.h will be included as a secondary template file. •Verilog use tbench.v or isotbench.v as the primary file. The isotbench template file dumps just the top-level signals of the MUT to the waveform window, while the tbench template file also dumps all of the transaction status signals. The tbench is the default test bench template file because it provides more information and the file is simpler. •Verilog with TestBuilder Enabled use tbuildTBench.cpp as the primary, with TbuildTBench.h, tbuildMain.cpp, and tbench.v included as secondary template files. •VHDL use either tbench.vhd or isotbench.vhd as the primary file. The isotbench template file dumps just the top-level signals of the MUT to the waveform window, while the tbench template file also dumps all of the transaction status signals. The tbench is the default test bench template file because it provides more information and the file is simpler. •VHDL with TestBuilder Enabled use tbuildTBench.cpp as the primary, with TbuildTBench.h, tbuildMain.cpp, and tbench.vhd included as secondary template files. •In New Template edit box, enter a file name for your new template file (this file will become your test bench). •Click OK to copy the template and add it to the Project window. Notice that the template file appears in the project window. |
To switch in a different template file:
•Choose Project > Set New Component Template menu option to open a file dialog. •Choose a template file that you created earlier using the Copy TestBench Template dialog. •Click OK to close the dialog and switch in the new template file. |