9.9 Project Menu and New Project Wizard dialog |

|

|
|
9.9 Project Menu and New Project Wizard dialog |
|
|
9.9 Project Menu and New Project Wizard dialog |
|
|
|
9.9 Project Menu and New Project Wizard dialog |
|
|
Projects are created, opened, saved, and closed using the Project menu options.
•Select the Project menu option and choose one of the project submenus: New Project, Open Project, Save Project, or Close Project. •Notice at the bottom of the menu there is a list of recently opened projects. •This menu also opens all of the different Properties dialogs that control how the test bench is generated and the tools used to simulate it. •The Export as BugHunter Project allows a TestBencher Project to be exported as a BugHunter project for simulation by those that do not have a TestBencher license. There is also a similar menu in BugHunter that will convert a project to a TestBencher Project. |
|
Create a Project using the New Project Wizard dialog:
•Choose the Project > New Project menu to open the New Project Wizard dialog which will step you through the process of creating a new project. |
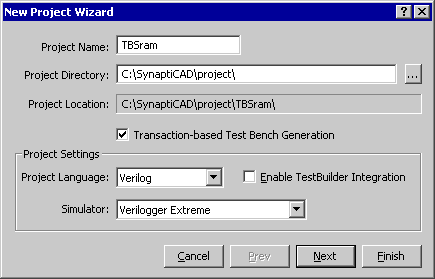
•Project Name will be the name of project and the subdirectory that the project will be stored in. •Project Directory contains the path for the base directory of the project. •Project Location displays the complete path to the project file. •Transaction-based Test Bench Generation check box enables multi-transaction, bus-functional model generation (i.e. a "TestBencher" test bench). If you uncheck this TestBencher will generate a BugHunter-style project, where only the StimulusAndResults diagram generates a test bench. •Project Language controls the test bench generation language. The available language selections are based on your TestBencher License file. •Simulator specifies the simulator that will be used for this project. The default settings are stored in the dialog reached by choosing the Options > Simulator/Compiler Settings menu. •Enable TestBuilder Integration enables C++ code generation for Verilog projects. This adds many advanced language features, such as constrained random number generation. •Click the Next button to view pane two of the New Project Wizard: |
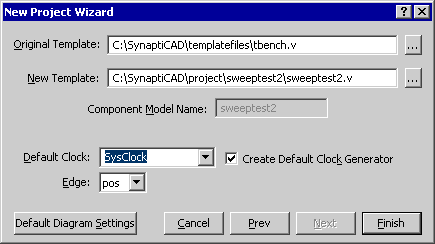
•The Template edit boxes specify the original and new (copied) template file names. The new template file will serve as the top-level source file for the test bench. This file is where the Transaction-Level Model is generated. A default original template file name is provided, but you can create your own template files. This feature rarely needs to be used (Section 7.8: Changing a Project Template File has information on editing and changing the template file). •The Default Clock box specifies the default clock to use when creating new constructs. •Edge specifies the default clocking edge to use when creating new constructs. •Create Default Clock Generator will create a transaction diagram with an output clock for clocked projects. This is useful for top-level projects. Sub-projects usually receive their clocks from the parent projects. •The Default Diagram Settings button opens the TestBencher Diagram Settings dialog which is used to set up the default diagram settings, such as verbose code generation. This dialog is discussed in Section 9.8: Diagram Settings dialog. |
