9.2 Component Instances of Sub-Projects |

|

|
|
9.2 Component Instances of Sub-Projects |
|
|
9.2 Component Instances of Sub-Projects |
|
|
|
9.2 Component Instances of Sub-Projects |
|
|
Projects listed in the Project Library folder can be instantiated and used by the containing project. When a sub-project is instantiated, TestBencher will generate a component instantiation in the top-level template within the $TBSubComponentInstantiation macro and make all of the transaction diagrams of the sub-project available to the owning project. The owning project can call the transactions of each instance of a sub-project. This is discussed in Section 7.1: Template, Sequencer, and Transaction Calls.
Create a Component Instance of the sub-project:
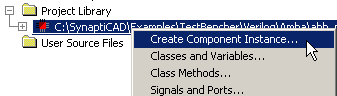
•Right-click on the sub-project node (the red chip icon) and select Create Component Instance from the context menu option. This will open the Create Component Instance dialog. |
|
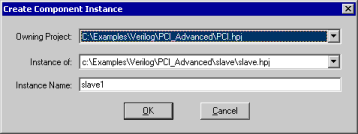
•Notice that by default the name of the selected Owning Project is the immediate parent project of the sub-project to be instantiated. The owning project can be changed using the drop-down list box. The Instance of drop down allows you to change the sub-project that will be instantiated. |
|
•Enter the Instance Name to use in the instantiation of the Project Component. •Press OK to close the dialog and add the component instance (green chip icon) to Transaction-Level Model folder. |
Edit the port mappings of the new component:
A new component instance uses the default port mappings that were set using the instructions in the Section 9.1 Sub-Projects. If these are correct you can skip this step. If there are multiple instances of a sub-project, then some of the port mappings will need to be edited so that this particular instance hooks up to the correct signals in the owning project.
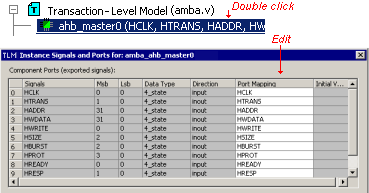
•In the Transaction-Level Model folder, double-click on the name of the component instance (green chip icon) to open the TLM Instance Signals and Ports dialog. •Double-click on a cell in the Port Mapping column and either type in a name or choose a signal name from the drop-down list. The signals in the list are the signals in the current project or the ports of the MUT. |
|
For more information about the Component Signals and Ports dialog, see Section 9.5: Signals and Ports for Components.