6.1 Text |

|

|
|
6.1 Text |
|
|
6.1 Text |
|
|
|
6.1 Text |
|
|
Text objects can be quickly added to a timing diagram by using the Text Mode button. Further editing allows font, color, formatting, and the attachment to be change.
Add a simple text object:
•Press the Text button so that right clicks will add text objects. |
|
•Right click to open and edit box and type in the text. When text is added it will be automatically attached to a preselected edge, a preselected segment, or attached to time (if no edge or segment was selected before the text object was added). |
Edit the text object:
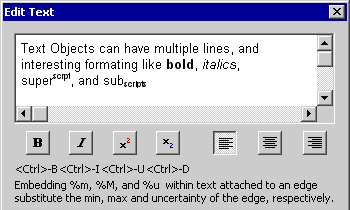
•Double click on the text object to open the Edit Text dialog. •Multiple lines can be added by using the <Enter> key. •Select some of the text and then press the bold, italic, superscript, or subscript styles to format the text. •The left, right, and center justification affects the text in the diagram but not inside the dialog itself. |
|
•If text is attached to an edge, the min, max and uncertainty of the edge can be displayed using the dynamic substitution codes %m, %M, and %u. •Also the name of the timing diagram file can be displayed with and without the file extension using the dynamic substitution codes %F and %f. The file name control code can be displayed in any text object. |
|
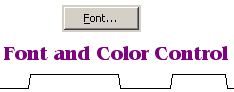
•To change the font or color of the text, press the Font button to open the Font dialog. •The default font settings are set at Options > Text/Color Preferences > Set Diagram Window Font. |
|
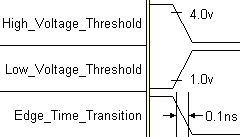
•Edge Threshold tick marks and values are displayed using text object. See Section 8.4 Display Edge Switching Thresholds for more information |
|
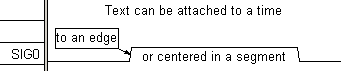
Text Attachment controls when and how text is displayed
When a simple text object is added, it is automatically attached to both a signal and either a time, event, or segment. This automatic attachment can be changed using the Edit Text dialog. There are also special attachments that fix the text at the top or bottom of a timing diagram.
•Inside the Edit Text dialog, the attached to something: at some place shows the current attachment. |
•Select the radio button for the new attachment and then click OK to close the dialog. •If you chose Attach to edge, Attach to segment, or Attach to closest signal, when you close this dialog the timing diagram editor go into a continuous selection mode. After closing the dialog, immediately move the mouse to the desired signal edge or segment and click on it to attach the text the element. To abort this operation, press the <ESC> key. |
|
•If you chose Attach to current time, then the text will be fixed at that time. •Checking Show Connection causes a box to be drawn around the text object and an arrow that points to the attached edge. •If you chose Attach to top left corner of window or Attach to bottom left corner of window, the text will be fixed in a specific position of the window. Regardless of how the diagram is scrolled or zoomed the text will be fixed in the specific position on the screen. This is handy for titles and logos. |
Hidden Signals and Text Objects:
Normally, hiding a signal will also hide the text and grid lines attached to the signal. However, sometimes it may convenient to use a signal just for holding text or grid lines, but otherwise that signal is unrelated to your circuit design and does not need to be displayed. The checking View > Show Hidden Text menu, then hiding the documentation signal will allow the text to continue to be displayed even though the signal is hidden.
Transparent or Opaque boxes Behind the Text:
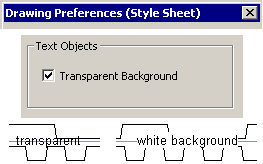
By default all text objects have a transparent background so that you can see the waveforms and parameters that appear under the text. This is especially handy for when you are working at different zoom levels. However, for printing and image generation you may wish to place a white background to all of the text objects.
•Choose the Options > Drawing Preferences menu to open the preferences dialog. •Uncheck the Transparent Background check box to create an opaque white box behind the text. |
|