6.2 Moving Text on the Alignment Grid |

|

|
|
6.2 Moving Text on the Alignment Grid |
|
|
6.2 Moving Text on the Alignment Grid |
|
|
|
6.2 Moving Text on the Alignment Grid |
|
|
Text can be moved using the mouse or the keyboard. Text that is attached to a time or an edge can be moved in all four directions (left, right, up, down). Text which is attached to a segment can only be moved up or down, because the horizontal position is determined by the segment. When text is moved it automatically snaps to the closest text alignment grid intersection.
Drag-and-drop text with the mouse:
•Click on the text object and drag it to the desired location. |
Nudge the text using the keyboard:
•Select the text by clicking on it, then use the arrow keys on the keyboard to nudge the text up, down, left, or right. |
Change the text alignment grid:
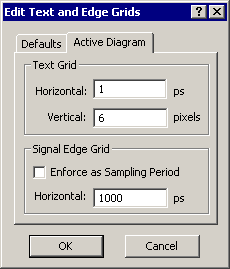
The placement of text objects is controlled by an invisible text alignment grid which makes it easy to line up text and help make neat looking timing diagrams. As you drag or draw a new text object, it is pulled into alignment with the nearest intersection of grid lines.
•Choose the Options > Text and Edge Grid Settings menu item to open the Edit Text and Edge Grids dialog. |
|
•In the Text Grid section, enter the new horizontal and vertical values. By default, we set the Vertical limit to a rather large 6 pixels to make it easy to line up text in a vertical direction, and use a very small value for the horizontal direction to give the most freedom of placement. •The Active Diagram and Defaults tabs, determine whether the settings affect the current active diagram or whether the settings will be used as the defaults for new diagrams. |
|
•Click the OK button to close the dialog. All new text objects will be aligned on the new grid intersections. Existing text objects will hold their current positions. |