Step 6: Generate the Test Bench |

|

|
|
Step 6: Generate the Test Bench |
|
|
Step 6: Generate the Test Bench |
|
|
|
Step 6: Generate the Test Bench |
|
|
Once the Sequencer Process has been edited, the test bench is ready for generation. This step will expand a series of macros in the template file. Any code that is between the begin and end statements of a macro will be destroyed and re-generated. Any code outside of the macros, such the body of the Sequencer Process will be preserved.
Generate the bus-functional model with the MAKE TB button:
•Press the Generate Test Bench button on the simulation button bar. This collapses then expands the macros in the template file. |
|
Viewing the Generated Code after MAKE TB:
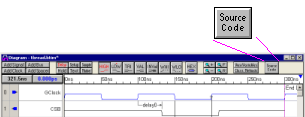
•TestBencher verifies that the source code files for each of the timing diagrams in the project is up-to-date. The diagram generates its transaction files each time it is saved. You can press the Source Code button to view the transaction code for each diagram |
|
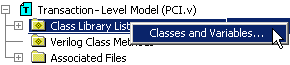
•All class libraries are regenerated. Double clicking on the Classes and Variables folder will show you the structures for the Project. |
|
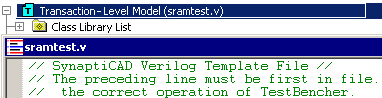
•The macro statements in the project's template files are expanded. Double-click on the Transaction-Level Model folder to open the template file. |
|
•During the Generate Test Bench process, several files are generated and they depend on the generation language (see Chapter 11: Language Specific Details for more information). All of the generated files are displayed in the Project window. |
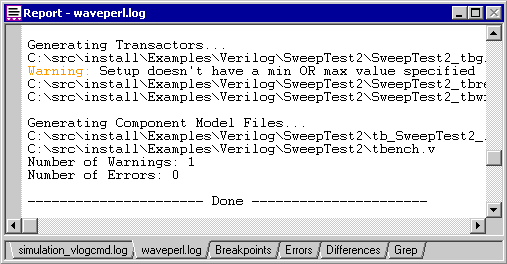
Generation Code Errors and Warnings:
Any errors and warnings that may occur during test bench generation will be reported in the test bench log file, waveperl.log in the Report window. Some possible errors include marker loops don’t match, invalid marker attributes, unable to find input and output files, and invalid file formats. TestBencher will also warn you of potential problems, such as two distinct signals within the same timing diagram using identical names but different directions (this may not always be a problem, but if the signal is being used as an output of the diagram, it may cause confusion). The log file will also list of the total number of warnings and errors that have occurred. If there are no errors in code generation then you are ready to simulate.
•In the Report window, click the waveperl.log tab and check for errors. If you can’t see the Report window, select the Window > Report menu to bring the window to the top of the screen. |