5.9 Documentation and Time Break Markers |

|

|
|
5.9 Documentation and Time Break Markers |
|
|
5.9 Documentation and Time Break Markers |
|
|
|
5.9 Documentation and Time Break Markers |
|
|
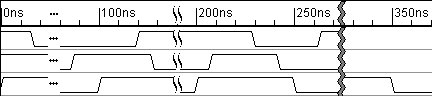
Documentation and Time Break markers can be used to split the visual image of the timing diagram for whatever purpose may be needed. For example, it may be useful to visually highlight a point of change in the timing diagram. The time break markers can also hide sections of the timing diagram.
Code Generation for Documentation and TimeBreak Markers:
If Verbose Markers is checked in the Diagram Settings dialog, then a message is written to the simulation log file when the documentation or time break marker is reached (see Section 9.8: Diagram Setting Dialog (TestBencher Only).These markers also generate a comment line in the source code for the transaction.
Documentation Markers:
When a marker is first added to the timing diagram, its type is Documentation. Double click on the Marker to open the Edit Time Markers dialog and use the controls to change the appearance of the marker.
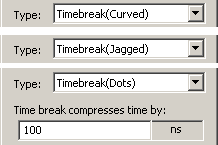
TimeBreak Markers:
•Add a Marker to the diagram and double click to open the Edit Time Markers dialog. •Choose one of the Timebreak types to make a dotted, curved, or jagged line. •To compress time to the right of the marker, enter a time into the time break compress time by box. The compressed time still exists, but it does not display on the screen. This only affects the drawn timing diagram and does not have any effect on the generated test bench code. |
|