3.5 Waveform Comparisons (Optional Features) |

|

|
|
3.5 Waveform Comparisons (Optional Features) |

|

|
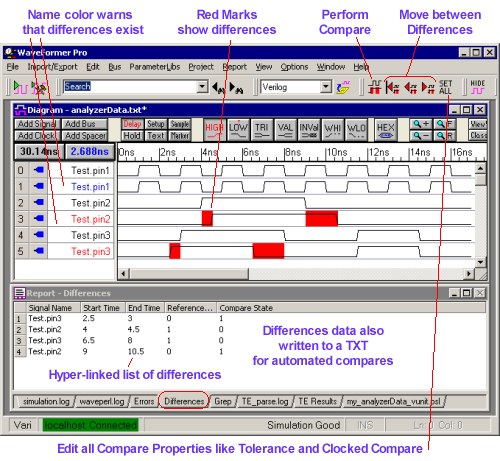
If you have purchased the Waveform Comparison option, then VeriLogger can graphically display the differences between compared waveforms for two timing diagrams (like two different simulation runs) or between individual signals. The specific regions where waveforms differ will turn red when the two waveforms are compared. By using the navigation buttons on the compare toolbar, you will be able to jump to the first difference and browse to each subsequent difference. When comparing two waveforms, the signal names must match. The full compare instructions are located in the Timing Diagram Editor Manual Chapter 9: Compare and Transaction Tracker but below are some quick tips that can get you started.

Comparing whole timing diagrams or simulation files:
•Run a simulation to generate a Stimulus and Results diagram, or load the first timing diagram with the File > Open Timing Diagram... menu or double click on an archived Stimulus and Results to open a diagram. •Next, load the second timing diagram using the File > Compare Timing Diagram... menu. This second file must be a timing diagram file with a btim extension, so you may need to first import this file normally and save it as a btim file prior to performing the comparison. You can also load an archived Stimulus and Results diagram, which is located in a subdirectory of the Project directory. •Closing the File Compare dialog (1) loads the second set of signals into the first timing diagram, (2) sets their signal type to compare, and (3) performs a comparison between any two signals that have matching names. |

•Normally the compare signals are interleaved, that is arranged so that they appear directly below the original signal. However, if you uncheck the Interleave Compare Signals setting in the Signal Difference Settings dialog, the compare signals will be displayed as a group below all of the original signals. Press the Signals Difference Settings button to open the dialog to change this option. |
|
The Compare Display and moving to comparisons:
•If there are no differences within the tolerance range, then the compare signal will have a blue name and the waveform will be all black. |
|
•If there are differences, then the compare signal will have a red name and the waveform will have red highlighted regions showing the differences |
|
•The arrow buttons on the compare tool bar move between the next and previous differences. |
|
•The One button determines how the next and previous searches are done. Normally searches find the next difference in time on any signal. If the One button is depressed, then the searches will only be done on the current signal. |
|
•The Hide button will hide any signal pairs that do not have any waveform differences. Once signals are hidden, the View > Show and Hide Signals menu can be used to re-show the hidden signals. |
|
Text Displays of the Differences:
•The differences are also listed in the Report Window Differences tab. Double clicking will take you to the difference. |

•The differences data is also written to a written to a tab-delimited text file named TimingDiagramName_diff.txt and saved to the project directory. This file can be used by external programs to do batch processing on the compares. |
Adjusting Comparison Tolerances using the Signal Properties dialog:
•To modify the tolerance for all the compare signals click on the Set All button, to open the Signal Properties dialog in group mode. |
|
•To modify the tolerance for one compare signal, just double click on the signal's name to open the Signal Properties dialog in individual mode. You can similarly modify the settings for a selected set of signals by highlighting the signal names and right clicking to edit those signals. |
•For unclocked signals, the -Tol and +Tol boxes specify the region to IGNORE differences before and after the edge on the reference signal. The default is 0ns (flag all differences). |
|
Forcing a comparison:
•The comparison regions are calculated once when either the compare file is loaded or when a signal changes type to Compare. To re-compare the signals, press the Compare All Compare Signals button on the main button bar. |
|
Control the number of differences displayed:
To avoid slowdowns in the comparison calculation when there are an unexpected number of differences, the compare feature by default will only show the first 1000 differences in the Differences tab window. To change this default:
•Press the Signal Difference Settings button to open the dialog. •Either type in the number of differences to display or check the Display All Signal Differences box. |
|