2.11 Using VPI applications to interface to the Simulator |

|

|
|
2.11 Using VPI applications to interface to the Simulator |

|

|
2.11 Using VPI applications to interface to the Simulator |

|

|
|
2.11 Using VPI applications to interface to the Simulator |

|

|
VeriLogger Extreme supports VPI (also called PLI 2.0). VPI is a C-based interface for communicating with Verilog simulators. Users create C/C++-based VPI applications that will be loaded by the Verilog simulator via dynamic linking (a dynamic link library(.dll) on Windows or a shared library(.so) on Unix). VeriLogger also supports the older PLI 1.0 standard (tf/acc functions).
Overview of VPI Example application
VeriLogger ships with an example VPI application that you can build and run under the SynaptiCAD/vpi_test directory to test out VPI functionality and learn how to use VPI function calls.
This example, vpi_test, is a VPI application that registers several user-defined tasks that can be called from Verilog source code. The main purpose of these tasks is to test the VPI functionality of a simulator and demonstrate the usage of VPI C calls. The code for registering the tasks is located in vpi_dll.c. The most important of these tasks is:
$traverse_top_modules
which will dump information about all the design objects in a simulation to the simulation log. For example, to dump the vpi structure of a verilog design, add these lines to one of your Verilog modules to call this function at the start of your simulation run:
initial
$traverse_top_modules;
Selecting an appropriate C/C++ compiler to compile the VPI application
VeriLogger Extreme ships with two versions of the simulator: a 32-bit simulator called simx32 and a 64-bit simulator called simx64. You must use an appropriate version of your C/C++ compiler to build a compatible PLI application (i.e. a 32bit PLI application for simx32 or a 64bit PLI application for simx64).
Basic Steps for creating and running the sample VPI application
•For Unix, use a C++ compiler like gcc. In the SynaptiCAD/vpi_test directory, there is a Makefile that can be used to build the sample VPI application. Edit the Makefile and change the SYNCAD_VPI_DIR variable to point to the root of your SynaptiCAD installation (e.g. /usr/local/syncad). •Run "make" to generate the library libvpitest.so. •If libvpitest.so is in a different directory, you can specify an absolute or relative path in the +loadvpi argument, or you can add the path to libvpitest.so to your LD_LIBRARY_PATH environment variable. When compiling your own PLI 2.0 applications, if your PLI application links against other shared libraries, make sure the operating system can find them by adding the required directories to the LD_LIBRARY_PATH environment variable. •For Windows, use Microsoft Visual Studio to open one the vpitest_vc*.sln files (use the 71 for Visual Studio 2003 and use 9 for Visual Studio 2005/2008) located in the SynaptiCAD/vpi_test directory. If you use a later version of MS Visual Studio, you will be prompted to convert the solution to the later version's project format. This will generate vpitest.dll to the SynaptiCAD\bin directory. If you have installed SynaptiCAD in a "read-only" directory, you will need to specify an alternative destination for vpitest.dll and modify the next step accordingly to point to this dll. •Build your VPI application using Visual Studio. •Inside your Verilog source code, you can add calls to tasks defined inside your VPI application. For example, vpitest.dll registers several user-defined tasks that can be called from Verilog source code. The main purpose of these tasks is to test the VPI functionality of a simulator and demonstrate the usage of VPI C calls. For this example, add the following code to one of your Verilog modules (or use the included example file test.v which already contains this call): initial $traverse_top_modules; •Tell the simulator to load the VPI application with the +loadvpi simulation option using one of the two methods below: •From the command line, enter a command like the following, where test.v is the Verilog source that calls the traverse_top_modules task defined by the vpitest.dll application. |
![]()
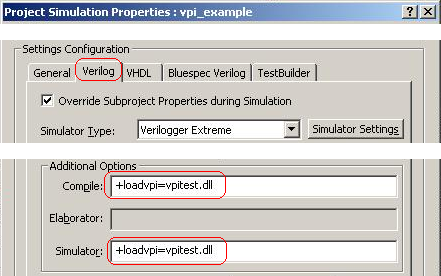
•From the BugHunter GUI, choose the Project > Project Simulation Properties menu to open the Project Simulation Properties dialog. Under the Verilog tab, add the command option to both the Compile and the Simulator options boxes. |

Note: When building, you may see the following warnings:
•'vpiHandle' differs in levels of indirection from 'void *' •'vpiHandle64' differs in levels of indirection from 'void *' |
These warnings are benign and can safely be ignored.
Enabling PLI/VPI access to object values (e.g. reg and wire values)
When simx is run under the BugHunter GUI, the +linedebug command line option is passed to the simulator. This option allows PLI applications to read and write the values of regs and wires (the GUI needs this option for it's debug capabilities also). However, when the simulator is run standalone from the command line, you will need to pass this option if your PLI application uses functions that read or write these objects. If this option is not passed and your application calls such a function, you will get a warning message such as:
pli_r: Warning 95002 ./myfile.v(26): Object of type vpiIntegerVar does not have a value.
Include files for VPI, ACC, and TF Functions
The header files to include in your PLI application are located in your SynaptiCAD installation directory under the subdirectory: simxkernel\src\vpi\rh .
•To use vpi functions in your PLI application, include the vpi_user.h file located in this directory. •To use tf functions, include the veriuser.h file. •To use acc functions, include the acc_user.h file. |
Some SynaptiCAD specific functions can also be used by including these files: acc_user_syncad.h and vpi_user_syncad.h.